Wrapping your vehicle yourself can be a rewarding project that saves money and gives your car a fresh, custom look. If you’ve been researching it, you’re likely looking for a practical guide that breaks the process into manageable steps. The good news is that with the right tools, preparation, and patience, a DIY wrap is possible for many car owners.
Table of Contents
- Tools, Materials, and Planning for How to Wrap a Car at Home
- Essential tools and materials
- How much vinyl do you need?
- Ideal workspace conditions
- Surface Preparation and Vehicle Readiness
- Wash and decontaminate the vehicle
- Inspect the paint condition
- Remove or loosen accessories
- Step-by-Step Process: How to Wrap a Car at Home Properly
- Step 1: Measure and cut vinyl
- Step 2: Position the film
- Step 3: Apply with a squeegee
- Step 4: Use heat on curves and contours
- Step 5: Trim edges cleanly
- Step 6: Wrap edges and recesses
- Step 7: Post-heat the film
- Common Mistakes, Troubleshooting, and Pro Tips
- Common mistakes to avoid
- How to fix bubbles and wrinkles
- Pro tips for better results
- Caring for the Wrap After Installation
- When to wash the wrapped car
- How to maintain appearance
- How long a DIY wrap lasts
- FAQ: How to Wrap a Car at Home
- Is it difficult to learn how to wrap a car at home?
- How much does it cost to learn how to wrap a car at home?
- How long does it take to complete how to wrap a car at home?
- What is the best vinyl for how to wrap a car at home?
- Can I do bumpers myself when learning how to wrap a car at home?
- Conclusion
Learning this involves more than simply applying vinyl to paint. Surface prep, measuring, cutting, stretching, and post-heating all matter if you want a smooth and durable finish. In this guide, you’ll learn the tools you need, the full wrapping process, common mistakes to avoid, and the best tips for getting professional-looking results from your own garage.
Tools, Materials, and Planning for How to Wrap a Car at Home
Before you begin these, gather everything you need in advance. Preparation is one of the biggest factors that determines whether your wrap looks clean and lasts for years or starts peeling after a few weeks.
Essential tools and materials
Here are the basics for a successful car wrap project:
– Cast vinyl wrap film
– Squeegee with felt edge
– Heat gun
– Infrared thermometer
– Precision knife or wrap blade
– Magnets or masking tape
– Measuring tape
– Isopropyl alcohol
– Microfiber cloths
– Clay bar or surface prep mitt
– Gloves designed for vinyl wrapping
– Edge sealer for high-stress areas
Cast vinyl is usually the preferred option because it is more conformable and easier to handle on curves than calendared vinyl. If you are serious about they, do not cut corners on material quality. Premium wrap films may cost more upfront, but they are easier to reposition and less likely to fail.
How much vinyl do you need?
The amount depends on the vehicle size:
– Compact car: 45–50 feet
– Sedan: 50–55 feet
– SUV: 55–65 feet
– Truck or large van: 65–75 feet
It’s smart to buy extra material, especially if this is your first time learning the concept. Mistakes happen, and having spare film for redos can save the entire project.
Ideal workspace conditions
Your workspace should be:
– Clean and dust-free
– Dry and enclosed
– Well-lit
– Between 68°F and 77°F
Temperature plays a huge role in vinyl behavior. If it’s too cold, the film becomes stiff. If it’s too hot, it can overstretch and distort. Anyone practicing the approach should prioritize a controlled environment.
Surface Preparation and Vehicle Readiness

The most overlooked part of it is prep work. A flawless wrap starts long before the vinyl touches the car. Dirt, wax, grease, and imperfections can all show through the film or reduce adhesion.
Wash and decontaminate the vehicle
Start with a thorough wash using a wax-free automotive soap. Then remove stubborn contaminants with a clay bar. Tar spots, bug residue, and sap should be eliminated completely.
After washing:
- Dry the car fully
- Wipe every panel with isopropyl alcohol
- Focus on edges, seams, and recesses
- Repeat until the surface is squeaky clean
If you want to master this, treat cleaning as a critical step, not a quick chore.
Inspect the paint condition
Vinyl wrap adheres best to smooth, factory-quality paint. Check for:
– Peeling clear coat
– Rust
– Deep scratches
– Dents
– Chipped paint
A wrap is not a miracle fix for damaged paint. In fact, bad paint may lift during removal later. Understanding these also means knowing when the surface is not suitable for wrapping.
Remove or loosen accessories
For better results, remove or loosen parts like:
– Badges
– Antennas
– Door handles if possible
– Mirrors if practical
– Trim pieces
– License plates
– Lights in advanced projects
This creates cleaner edges and a more seamless finish. While not every DIY installer removes these parts, doing so greatly improves the final look when learning they.
Step-by-Step Process: How to Wrap a Car at Home Properly
Now it’s time to get into the actual process of the concept. Work one panel at a time. Start with flatter areas such as the hood, roof, or doors before attempting bumpers and complex curves.
Step 1: Measure and cut vinyl
Measure the panel and cut a piece with 3–4 inches of extra material on all sides. This extra margin gives you room to reposition and wrap edges.
Avoid cutting pieces too small. One of the classic beginner mistakes in the approach is underestimating how much vinyl is needed for corners and tucked sections.
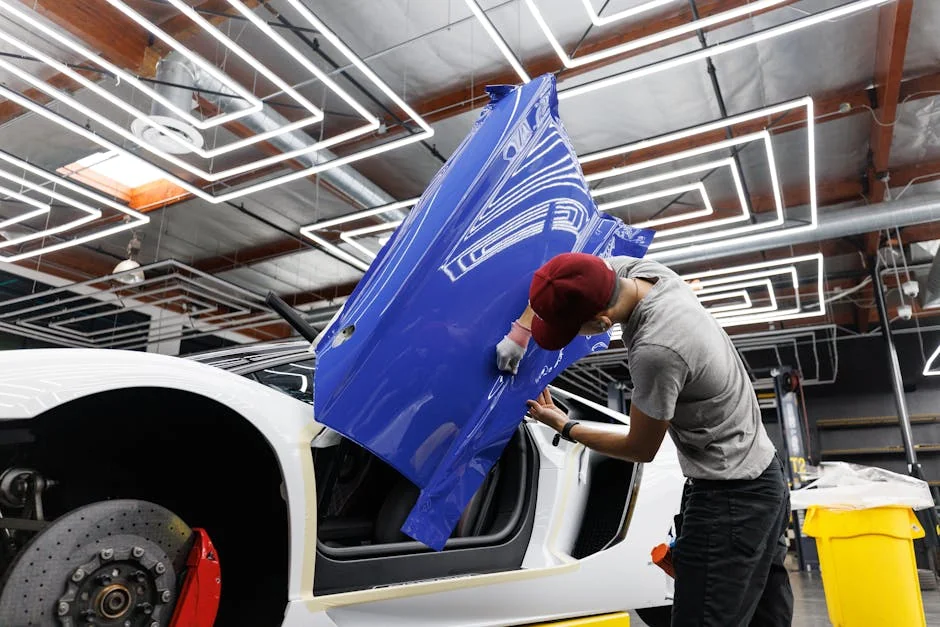
Step 2: Position the film
Use magnets or masking tape to hold the vinyl in place before removing the backing paper. Align it carefully so there is even excess around the panel.
Once aligned, peel back part of the liner and begin laying the film gently onto the surface. Do not press hard immediately. The early stage of it is about placement, not permanent adhesion.
Step 3: Apply with a squeegee
Starting from the center, use your squeegee to push the vinyl outward in overlapping strokes. This helps remove air and keeps the film smooth.
Key techniques include:
– Work from center to edges
– Use firm but controlled pressure
– Keep the surface tension even
– Lift and reset if wrinkles form
Never force a wrinkle flat without lifting it first. In this, forcing the film often traps tension that later causes lifting.
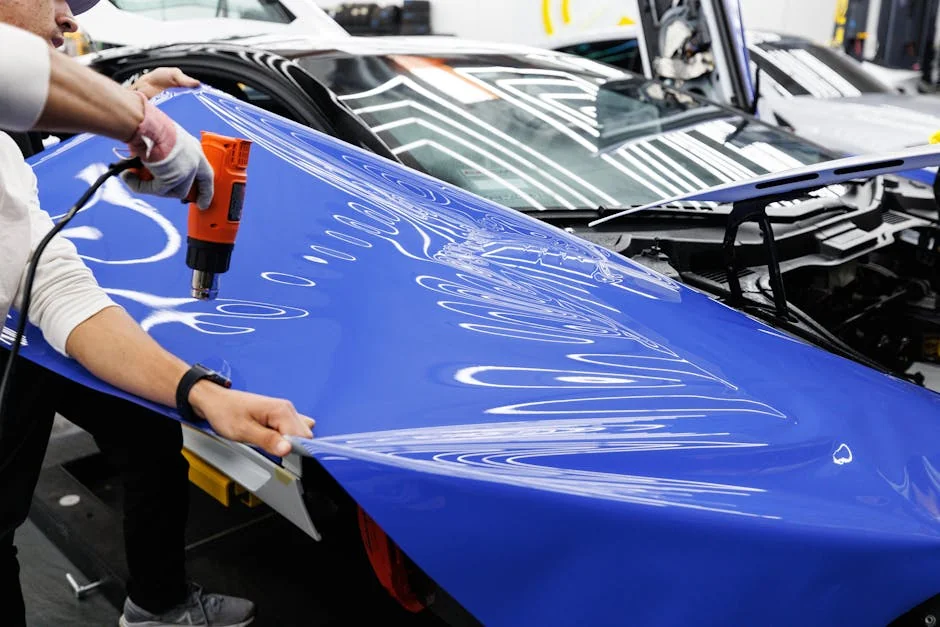
Step 4: Use heat on curves and contours
Complex areas like wheel arches, bumpers, and mirror caps require heat. Use a heat gun carefully to soften the vinyl, making it more flexible.
Important heat tips:
– Warm gradually, don’t overheat
– Stretch only as much as necessary
– Avoid thinning the film too much
– Let the vinyl conform naturally where possible
One major skill in these is knowing the difference between gentle shaping and over-stretching. Too much stretch can discolor the wrap or reduce longevity.
Step 5: Trim edges cleanly
After the film is applied smoothly, trim excess vinyl using a sharp blade. Keep your cuts precise and controlled to avoid damaging paint.
Best practices:
– Use light pressure
– Change blades often
– Cut away from visible paint when possible
– Leave enough vinyl to wrap around edges
Sharp trimming is essential in they because rough cuts can make an otherwise good installation look amateur.
Step 6: Wrap edges and recesses
Tuck the vinyl into seams and around edges using your squeegee or fingers with wrap gloves. Edges are common failure points, so take your time.
Apply extra pressure on:
– Door edges
– Hood edges
– Trunk seams
– Wheel arch lips
Use edge sealer where appropriate, especially on high-wear areas. Successful the concept projects often come down to edge management more than surface application.
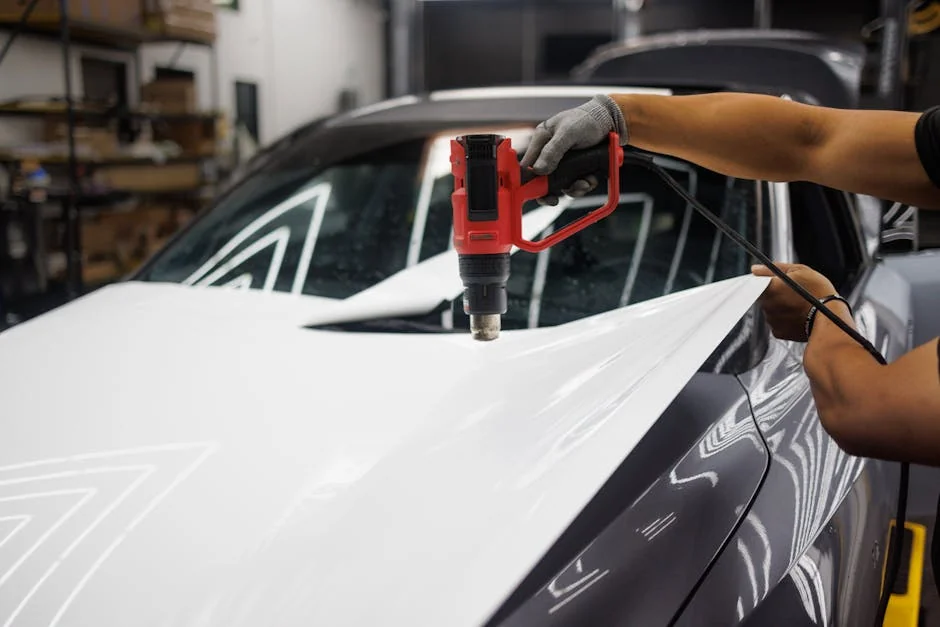
Step 7: Post-heat the film
Post-heating is crucial. It resets the vinyl memory in stretched areas and helps prevent lifting. Use your heat gun and check the manufacturer’s recommended temperature, often around 190°F to 220°F for stretched zones.
Focus on:
– Deep recesses
– Curved sections
– Corners
– Edges
– Any area that required stretching
Skipping this step is a common reason DIY wraps fail. If you truly want to understand the approach, post-heating is non-negotiable.
Common Mistakes, Troubleshooting, and Pro Tips
Even with a solid plan, mistakes happen. The good news is that many problems can be fixed if caught early. When working on it, patience matters as much as technique.

Common mistakes to avoid
#### 1. Poor cleaning
Any dust or grease under the film can ruin adhesion and appearance.
#### 2. Overstretching vinyl
Stretching too much weakens the film and may cause it to shrink back later.
#### 3. Ignoring temperature
Vinyl is far harder to control in the wrong conditions.
#### 4. Using too little material
Extra vinyl gives you room to adjust and wrap edges properly.
#### 5. Rushing complex panels
Bumpers and mirrors are difficult. Save them for after you gain confidence.
These issues are common when beginners first attempt this, but they are avoidable with careful work.
How to fix bubbles and wrinkles
Small bubbles can often be worked out with a squeegee toward the nearest edge. If a bubble remains after application, you may be able to lift and relay the film.
For tiny trapped air bubbles:
– Warm the area lightly
– Massage air outward
– Use a pin only as a last resort
Wrinkles should usually be lifted and reset, not pressed flat. A key lesson in these is that vinyl often rewards reworking rather than forcing.
Pro tips for better results
– Start with a smaller project if you’re new, such as the hood or roof
– Use knifeless tape for cleaner cuts
– Keep blades fresh at all times
– Watch for tension lines in glossy film
– Take breaks to avoid sloppy mistakes
– Have a helper for large panels
– Practice on scrap vinyl first
Many people underestimate the learning curve of they, but steady progress panel by panel is often the best route to a great finish.
Caring for the Wrap After Installation
Once you complete the concept, proper maintenance will help preserve the finish and extend the wrap’s lifespan. A well-installed and well-maintained wrap can last several years depending on climate, exposure, and material quality.
When to wash the wrapped car
Wait at least 48 hours after installation before washing the vehicle. This gives the adhesive time to settle properly.
After that:
– Hand wash with gentle soap
– Use soft microfiber mitts
– Avoid abrasive brushes
– Rinse thoroughly
Automatic car washes, especially brush-style systems, can damage edges and shorten wrap life. Part of knowing the approach is also understanding how to protect your work afterward.
How to maintain appearance
To keep the wrap looking good:
– Remove bird droppings quickly
– Wipe fuel spills immediately
– Park in shade or use indoor storage when possible
– Use wrap-safe cleaners
– Avoid harsh solvents
Matte and satin wraps often require special products. If you used one of these finishes while learning how to wrap a car at home, check the film manufacturer’s care instructions.
How long a DIY wrap lasts
A quality wrap installed properly may last 3 to 7 years. Factors affecting longevity include:
– Sun exposure
– Climate extremes
– Installation quality
– Maintenance routine
– Film brand
Garage-kept vehicles usually see better wrap lifespan. If your goal in how to wrap a car at home is long-term value, material choice and post-install care matter just as much as installation skill.
FAQ: How to Wrap a Car at Home
Is it difficult to learn how to wrap a car at home?
It can be challenging at first, especially on curved panels and bumpers, but how to wrap a car at home becomes much easier with the right tools, a clean workspace, and patience. Flat panels are beginner-friendly, while complex shapes require more practice.
How much does it cost to learn how to wrap a car at home?
The cost of how to wrap a car at home depends on your vehicle size and material quality. Most DIY projects cost significantly less than professional installation, but you should still budget for premium vinyl, tools, prep supplies, and extra material for mistakes.
How long does it take to complete how to wrap a car at home?
For a beginner, how to wrap a car at home can take anywhere from a weekend to several days. A full car wrap often takes longer than expected because prep, repositioning, trimming, and post-heating all require time.
What is the best vinyl for how to wrap a car at home?
For how to wrap a car at home, cast vinyl is generally the best choice because it conforms better to curves, lifts more cleanly for repositioning, and usually lasts longer than cheaper alternatives.
Can I do bumpers myself when learning how to wrap a car at home?
Yes, but bumpers are one of the hardest parts of how to wrap a car at home. Many beginners practice on doors, hoods, or roofs first and leave bumpers until they are more confident with heat, stretching, and tension control.
Conclusion
If you’re determined to learn how to wrap a car at home, success comes down to preparation, precision, and patience. A DIY wrap is absolutely achievable, but it requires more than enthusiasm. You need quality materials, proper cleaning, careful panel planning, controlled heat use, and thorough post-heating to get durable results.
The best approach to how to wrap a car at home is to move slowly, work panel by panel, and accept that your first attempt may involve a learning curve. With practice, even beginners can achieve a clean, eye-catching finish that transforms the look of a vehicle while saving money compared with professional installation.